If you’ve read these instructions and still need help using the course site, you can either talk to me after class or email me at [email protected] with a short description of your problem. If I can’t help over email, we can make an appointment to meet outside of class.
Step 1: Registering for the CUNY Academic Commons
You must sign-up and register for the Commons to join your course group or site. You must use your CUNY email to join but this can be changed in your profile later (see below). To join the CUNY Academic Commons:
- Head to the CUNY Academic Commons: https://commons.gc.cuny.edu/
- Click “Register” in the top right corner.
- Create a Username that is suitable for your course. A good username might be your first name and last initial.
- Use your CUNY email address to register.
- Enter your full name. You can make this private later.
- Please choose your CUNY College so we know which CUNY campuses are using the Commons!
- Agree to the Terms of Service (Don’t worry, we don’t collect data on you and anything you add or create on the CUNY Commons is yours.)
You’re done! Now that you have registered for the CUNY Academic Commons, you can edit your profile and go join groups and sites for your classes.
Step 2: Editing your Commons Profile
You can change, hide, and add information to your Commons Profile. You will need to get emails from the commons to receive information from your professor about class. To make sure you get Commons emails, you may want to change your email address to a non-CUNY email if you check your personal email more often. To edit a Commons profile:
- Sign in to the Commons with your newly created username and password
- Click the arrow in the upper right-hand corner of the page
- Select “My Profile”. This takes you to your public profile
- Use the “Edit Profile” button to make changes
- Change your email, picture, and other information here
Step 3: Joining the Course Site
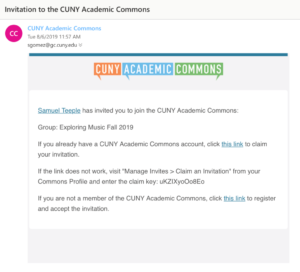
I will send an invitation to join our course site to your CUNY email address. After you have registered for the commons, click the link in the email to accept the invitation. Doing so will allow you to receive emails from me regarding the class and post in our class blog.
Step 4: Commenting on my Welcome Post (or any post)
Leaving a comment on the Welcome post in the blog is how you can earn credit for successfully making an account and joining the course site. You’re also expected to leave a comment on a classmate’s post for each assigned blog, so refer back to these steps if you need to.
To locate the Welcome post, click on the “blog” tab circled in red in the screenshot below.
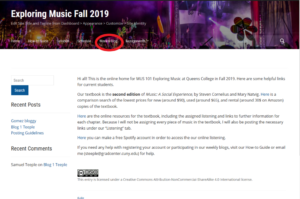
At the bottom of the post, seen below, is a text box for you to type your comment. Once you’ve answered the four questions listed in the Welcome post, click the “post comment” button.

Step 5: Posting to the Blog
To create a blog post, follow these directions.
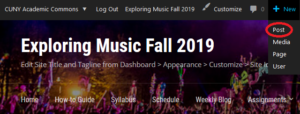
- From any page on the course site, hover your mouse over the “New” button found in the black toolbar at the top of the site.
- In the drop down menu, select “Post,” circled in red in the screenshot below.
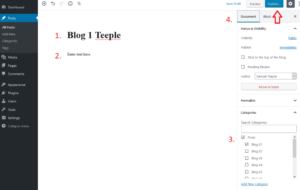
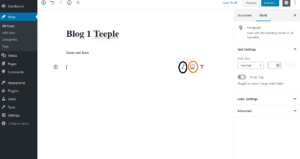
- Title your post with the blog number and your last name (seen at the red number 1 in the screenshot below).
- Type up your blog (seen at the red number 2 in the screenshot below).
- Make sure the “Document” tab is selected (underlined in blue and next to the red number 4 in the screenshot below).
- Categorize your blog correctly by selecting the “Posts” option and the correct blog number under the “Categories” tab (seen at the red number 3 in the screenshot below).
- Share your blog post by clicking the publish button in the upper right corner (seen near the red number 4 in the screenshot below). This button may appear as “schedule” instead of “publish,” but it will still post your blog to the site.
To insert media into your blog post, follow these directions:
- Include a youtube video in your post by pasting the URL (not the embed code) into the textbox.
- Include an image by creating a new paragraph, and selecting the image option that appears on the right (circled in orange in the screenshot below).
- Include an audio file by creating a new paragraph, and selecting the audio option that appears on the right (circled in black in the screenshot below)

This entry is licensed under a Creative Commons Attribution-NonCommercial-ShareAlike 4.0 International license.
Recent Comments